Sunday 5 December 2010

Development!


Socks! I want him to have some true scottish guard socks! Maybe not white as thats abit boring. So I will develop the colour more when I get texturing. 
Straps and Belts! I want Mcglone to have some belts on him now as well as a clip and a random strap. I don't plan to go crazy with modeling as I can maybe get away with texturing the patterns. I was looking into some nice celtic patterns that would suite but you most like wont see it all so no need to go crazy.


Here is the new design for the kilt! I wasn't to keen about the last so have gone into photoshop and changed things about.
Ok! I had my model and development nearly finished then I took another look at my Character and thought. NO!! I didn't like his clothes. I thought it needed more. So I didn't go crazy as I still want to give the idea that this character is made out of clay and his objects are tiny but made out of other materials. So Now I have start to research into changing his kilt colour, adding some socks and some straps! More highlander.

Renders Renders and Renders!

Now let the testing begin! 

Firstly wanted to comment on the texturing. I took the base colouring I did in zbrush and went into photoshop and using hair brushes I made and found on the internet I created a more detailed texture. I didn't go to crazy but I am alot happier than I was with the texture now.

Below are a selection of renders, the bottom one was the first out of the lot but will comment on each one and say what I liked or disliked about each one.

 Now this image makes me think. I like this render. I used a lambert for it and I know theres no reflection or specular but the texture comes out so much nicer than before! maybe I can try implement this when I do render passes?
 Blinntastic! Yeah this render was to much reflection and to much everything. Horrible effects going on there and the reflections are making the textures look strange.
 Another image with different lights. Wasn't to impressed or unhappy about this render. Needs work as the model doesn't standout well enough for me. The environment might not be there and the camera doesn't suit the lighting.
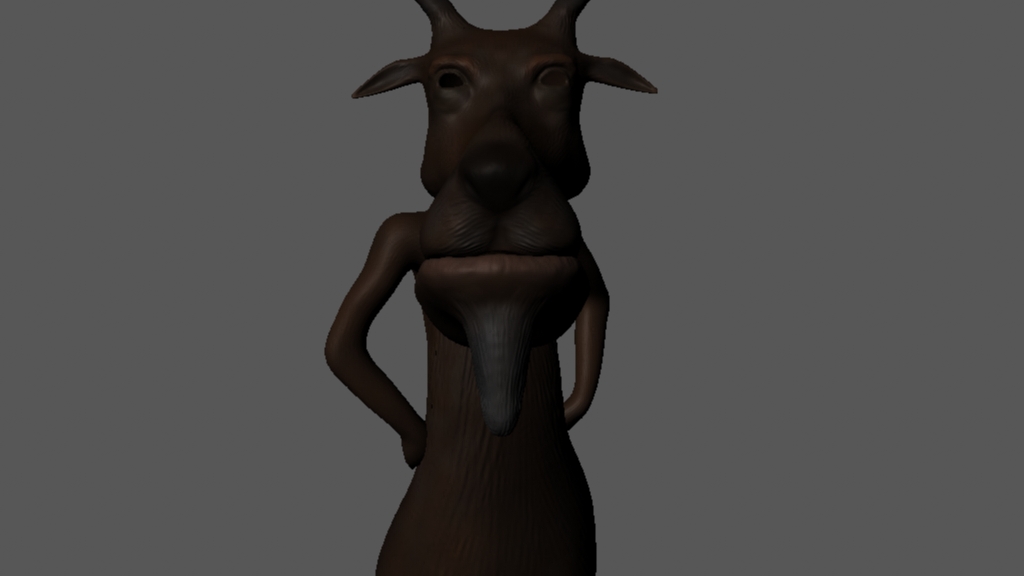
 Here is a ok render. No base this time, I was trying to get some specular and reflection, I thought underneath the chin was a nice result also near the elbow.

A front image of the one below. I am happy with the outcome, apart from textures. I might try add a IBR image to bring out some more interesting reflections and better lighting but that will be done when I am comfortable with the shader settings.
This was the first of the lot and is one of my favourite as I used blinn as well as lowering the reflection and specular down but I kept a hint of both there. Again I wasn't to keen on the texturing here and wanted to improve on that right away, But I am happy with the kilt textures they are fitting the job well and down plan to mess around with them to much.

Back into Maya!


Here are some quick renders showing the displacement maps and texture back in maya. At the moment I am not happy with them I feel that the texture is a low level to what I want and the displacements need abit more work to bring out the scratch clay surface. Also I am still learning about shaders so I am going to experiment with Blinn and Lambert, Blinn I feel will be the best as it will give off reflections and specular and I can adjusts these easily.

Basic base!


Here are some images of the base that I have sculpted in zbrush. I plan to texture these later next week properly as I want to get the character done to a high standard before I worry about the extra things. I am happy about how I have placed things and I wanted to give the impression of him stranding on a mound surrounded by poo but  haven't added this yet.

Thursday 2 December 2010

Cloth Detail


These images show the development of the cloth detail for Mcglone's texture. I feel I will tone them down a little bit more and try define the shape more. The textures are very simple. I was going to go into adding linen detail but I think I will use an blending mode in photoshop instead of trying to get a displacement map or bump working, I don't think it would make much difference.

Mcglones Textures coming together!


Here is a close up of the model as it stands. I have Modeled and Uv'ed all the cloth now. Going to finish the Sheath then going to start to bring the body texture back in and see if I can improve on the textures in photoshop. Up to here I am very confident in my skills but here is where I start to go into unfamiliar territory. I haven't done much really high detailed texturing and rendering, I have nearly finished the texturing and left my self 2 weeks to now start playing with rendering and lighting etc, this will also show me weak areas in the model!

Environment Base mesh!


Here a Selection of images showing the base mesh for the mound I want the character to be on for his turntable! I didn't want just a basic character spinning, I wanted a posed character and an environment that represents him in someway. Also you can see that I have textured his cloth now and given it some movement, this was done all in maya and Zbrush.

At this moment in time I am happy with the outcome. I still need to see all the textured files together before I can really start to edit the final look of the model.